
You're probably here because you've hit the point where SSHing into servers one by one has stopped being “fine for now” and started becoming a tax on every release. A package install succeeds on one machine and fails on another. A config change gets applied to staging but not production. You restart a service on the wrong host, then spend the next hour proving to yourself that you didn't.
That's the moment Ansible starts making sense.
Ansible became a dominant automation tool early because its agentless architecture and straightforward YAML approach made it easier to adopt than heavier alternatives, passing 1,000,000 downloads early in its lifecycle according to an Ansible milestone presentation on Slideshare. It handles configuration management, deployments, and orchestration without requiring client software on the machines you manage.
This guide is for the gap most beginner content leaves open. Getting your first ping response is nice. Getting a repeatable workflow that won't embarrass you in production is better.
Table of Contents
- Why Manual Configuration Is Costing You Time and Sanity
- Setting Up Your Ansible Control Node and Managed Hosts
- Your First Commands Inventory and Ad-Hoc Execution
- From Commands to Code Writing Your First Ansible Playbook
- Organizing Your Automation with Roles and Ansible Galaxy
- Securing Your Automation with Ansible Vault and Best Practices
- Common Troubleshooting and Your Path to Advanced Automation
Why Manual Configuration Is Costing You Time and Sanity
Manual configuration fails in boring ways. You update a package on twelve hosts, and one machine has a slightly different repo state. You edit a config file over SSH, then realize your shell history is now your only documentation. You restart a service and can't remember whether the previous host needed a different path or a different user.
That kind of work doesn't just waste time. It makes your environment drift.
Ansible fixes the underlying pattern, not just the symptom. You describe the state you want, store it in version-controlled YAML, and run it against a known set of hosts. That's a better operating model for founders, developers, and ops teams who want fewer mysteries during releases.
Manual changes feel fast once. They feel expensive every time after that.
One reason Ansible spread so quickly is that it didn't ask teams to install and maintain an agent everywhere. It runs over standard SSH and lets you automate tasks in a syntax that's readable enough for people outside pure ops to follow. If you're trying to streamline business processes across technical and non-technical workflows, that readability matters because more people can review what the automation is doing.
Here's the practical shift Ansible gives you:
- From snowflake servers to declared state. You stop relying on memory and terminal history.
- From one-off fixes to repeatable runs. The same playbook can configure a fresh host or reconcile an existing one.
- From hidden knowledge to shared operations. YAML in Git is easier to review than shell commands passed around in chat.
The most useful mindset change is this: don't treat Ansible as a remote command runner with nicer syntax. Treat it as a way to make infrastructure behavior predictable.
Setting Up Your Ansible Control Node and Managed Hosts
Before you automate anything, get the foundation right. Most beginner frustration happens before the first playbook ever runs.

What runs where
Your control node is the machine where Ansible is installed and from which you execute commands. Your managed hosts are the servers Ansible connects to. In the simplest setup, your laptop can be the control node. In a team setting, a dedicated automation box is often cleaner.
Managed hosts don't need Ansible installed. That's the whole point of agentless operation. They need SSH access and a usable Python runtime on the target system.
A minimal mental model looks like this:
| Component | Purpose | What you need |
|---|---|---|
| Control node | Runs ansible and ansible-playbook |
Ansible installed, SSH client access |
| Managed host | Receives instructions | SSH reachable, Python available |
| Inventory | Defines targets | A YAML or INI file listing hosts and groups |
The SSH setup most beginners get wrong
This is the first real hurdle, and it's where many people lose momentum. A setup guide cited in your research notes says 68% of early-stage deployment failures come from incorrect ssh-copy-id permissions or bad passphrase expectations in non-interactive automation, described in this Medium walkthrough.
The fix is straightforward if you're disciplined:
- Generate a key pair on the control node with
ssh-keygen -t ed25519. - Copy the public key to the managed host with
ssh-copy-id. - Test raw SSH access before touching Ansible.
- Only after SSH works cleanly, run
ansible -m ping.
A few practical rules matter here:
- Use the right user. If Ansible will connect as
deploy, set up keys fordeploy, not your personal admin account. - Avoid interactive surprises. If your automation depends on someone typing a passphrase into a prompt, it isn't automation yet.
- Fix ownership problems early. Misowned home directories and
.sshfolders produce errors that look like networking issues but aren't.
Practical rule: Don't debug Ansible until plain SSH works exactly the way you expect.
Verify connectivity before writing playbooks
Once key-based SSH is solid, create a tiny inventory and test with the ping module. That verifies control-node-to-host communication, Python availability, and basic authentication in one step.
A good first check is simple:
- Start with one host so errors are obvious.
- Use explicit inventory paths instead of relying on defaults.
- Keep output readable and resist the urge to pile on variables too early.
If ansible -m ping fails, don't write YAML and hope it gets better. Fix the transport layer first.
Your First Commands Inventory and Ad-Hoc Execution
The first “Ansible clicked for me” moment usually comes from two things: a clean inventory and a useful ad-hoc command.
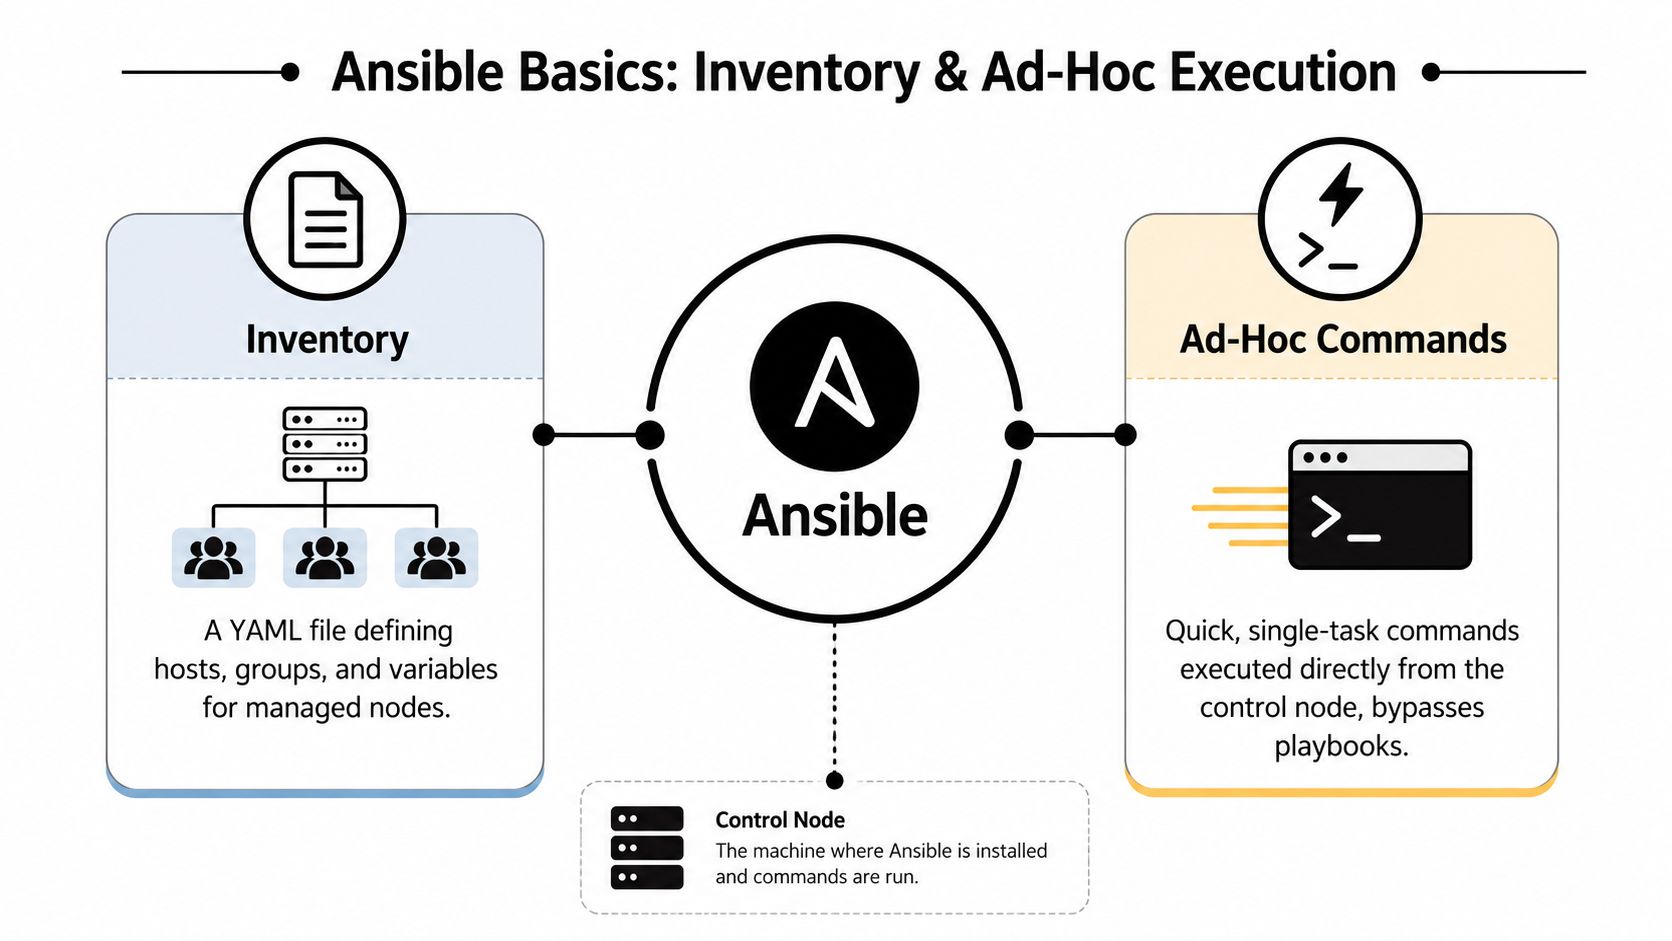
Treat inventory like an address book with rules
Inventory is the source of truth for what Ansible can target. If you keep it sloppy, every command after that gets riskier.
Use YAML inventory from the start. It's easier to read once you begin grouping hosts and assigning variables. A simple pattern looks like this:
all:
  children:
    web:
      hosts:
        app01:
        app02:
    db:
      hosts:
        db01:
Group names should reflect operational intent, not trivia. web, db, workers, and monitoring are useful. ubuntu-boxes usually isn't, unless the operating system itself is the reason you'll target them differently.
A few habits pay off early:
- Group by role. Targeting
webis clearer than remembering hostnames. - Keep host variables rare. If a setting applies to a group, define it at the group level.
- Name things for future you. Inventory should still make sense after six months.
Useful ad-hoc commands that teach you fast
Ad-hoc commands are great for short, one-off tasks. They're not a replacement for playbooks, but they're perfect for proving your setup works and learning module behavior.
Try them for actions like:
- Connectivity checks with
ansible all -m ping - Uptime checks with the
commandmodule - Package queries on a host group before a rollout
- Service status checks when debugging a deployment
Here's the trade-off. Ad-hoc commands are fast, but they don't give you durable automation. If you run the same ad-hoc command twice in a week, it probably belongs in a playbook.
Inventory is where discipline starts. If you can't say exactly which hosts a command will touch, stop before you press Enter.
There's another practical reason to move beyond a hand-maintained list as environments grow. Static inventory is fine at the beginning, but dynamic inventory becomes more attractive as cloud resources change frequently. That isn't something you need on day one, but it's worth planning for if your host list won't stay still.
From Commands to Code Writing Your First Ansible Playbook
Ad-hoc commands prove access. Playbooks create repeatability.
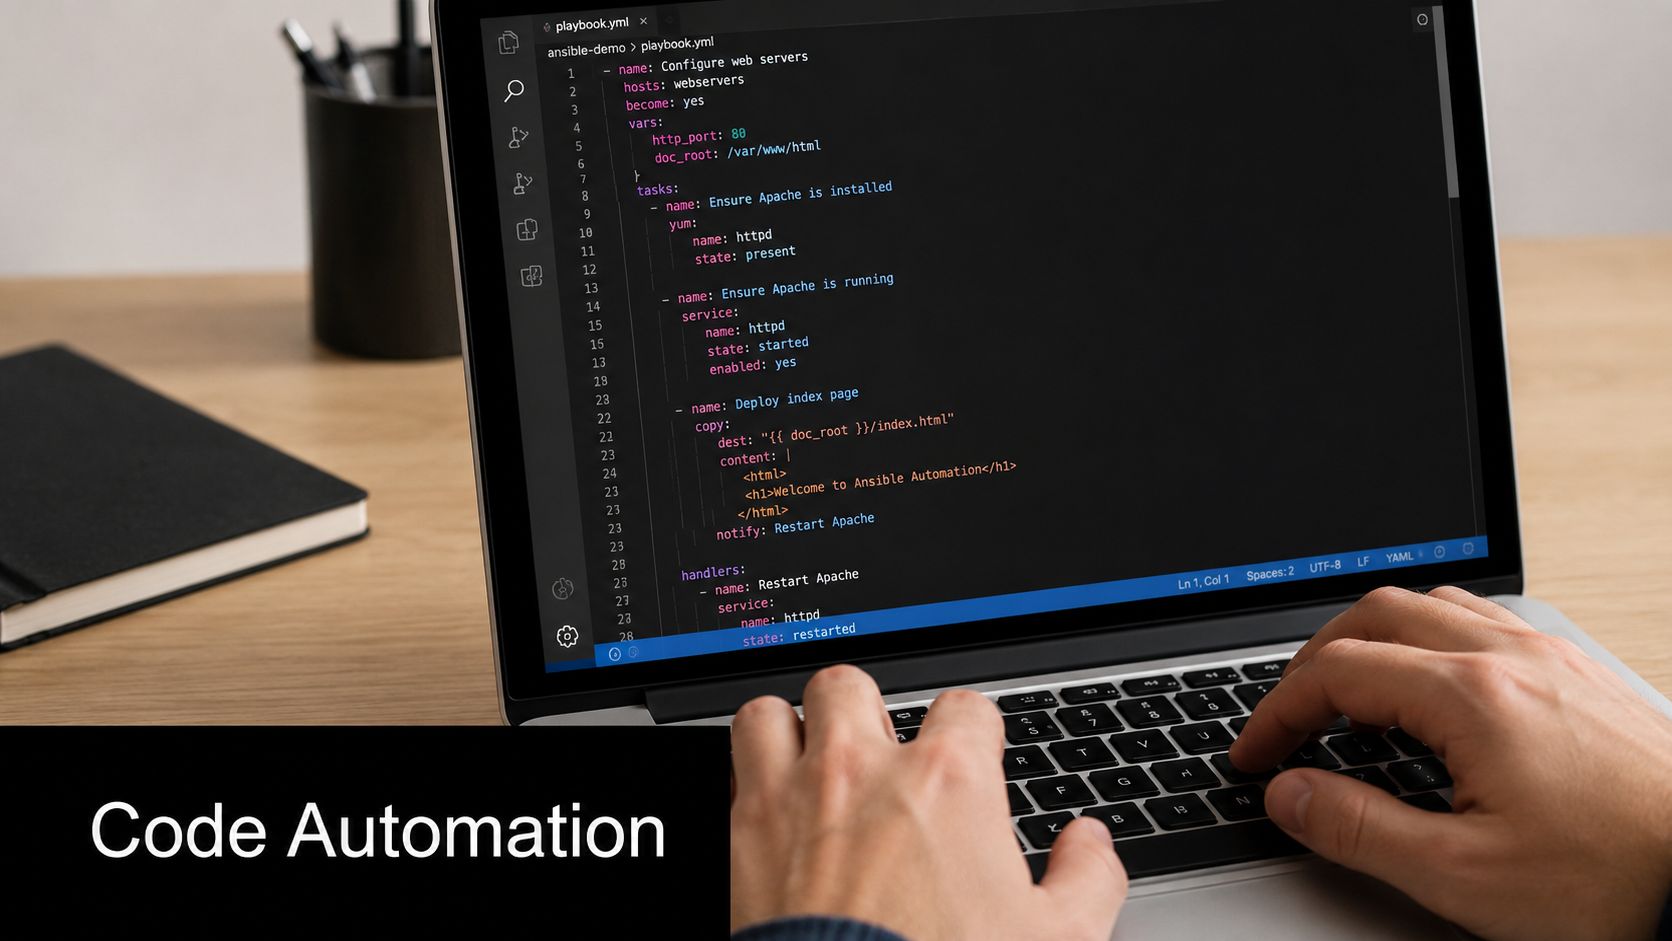
A playbook declares the state you want. For a first useful example, installing and managing Nginx is better than the usual “echo hello world” toy task because it touches packages, services, and idempotency in one file.
A simple Nginx playbook
Start with something like this:
- name: Install and run Nginx
  hosts: web
  become: true
  tasks:
    - name: Install Nginx
      ansible.builtin.package:
        name: nginx
        state: present

    - name: Ensure Nginx is running
      ansible.builtin.service:
        name: nginx
        state: started
        enabled: true
This is small, but it teaches the right lessons:
- The play targets a host group.
become: truehandles privilege escalation.- Each task uses a module that describes desired state.
- Running it again shouldn't create unnecessary changes.
That last point is idempotency, and it's one of the reasons Ansible is worth using. A good playbook converges systems toward the same state every time instead of replaying blind shell commands.
If you need to change a config file and restart Nginx only when the config changes, add a handler. That's where playbooks start feeling like operational code instead of remote administration.
What fact gathering is doing behind the scenes
A lot of beginners notice that the first playbook run feels slower than expected. That's often because Ansible gathers facts before tasks execute.
According to a detailed explanation of Ansible facts on OneUptime, Ansible's setup module automatically collects host properties such as IP addresses, OS versions, hardware details, and other system data before tasks run. Those values are stored in ansible_facts, which lets your playbooks adapt to the actual state of each machine.
That's why conditionals like these work:
when: ansible_facts['os_family'] == 'Debian'
Facts are what let one playbook behave intelligently across different environments instead of assuming every host is identical.
When to disable gather facts
You shouldn't gather facts blindly on every run. Some tasks don't need them. If you're doing a quick service restart or a simple file copy, fact collection can be unnecessary overhead.
A practical pattern looks like this:
| Situation | Recommendation |
|---|---|
| You branch logic by OS or package manager | Leave fact gathering on |
| You need network or hardware details | Leave it on, or narrow the subset |
| You're doing a small targeted action | Set gather_facts: false |
| You care about speed on large runs | Use a smaller fact subset |
A beginner-friendly version:
- name: Restart Nginx quickly
  hosts: web
  gather_facts: false
  become: true
  tasks:
    - name: Restart Nginx
      ansible.builtin.service:
        name: nginx
        state: restarted
Most basic tutorials skip this trade-off, which is why newcomers often think Ansible itself is slow. It isn't always slow. Sometimes it's collecting information you didn't need.
Organizing Your Automation with Roles and Ansible Galaxy
A single playbook is fine for learning. It becomes a liability once you add templates, variables, handlers, and environment-specific behavior.
Why a single playbook stops scaling
Beginners often keep appending tasks to one file because it feels simpler. Then the file grows into a long sequence of package installs, config copies, conditional branches, and restarts. At that point, reusability is gone and review becomes painful.
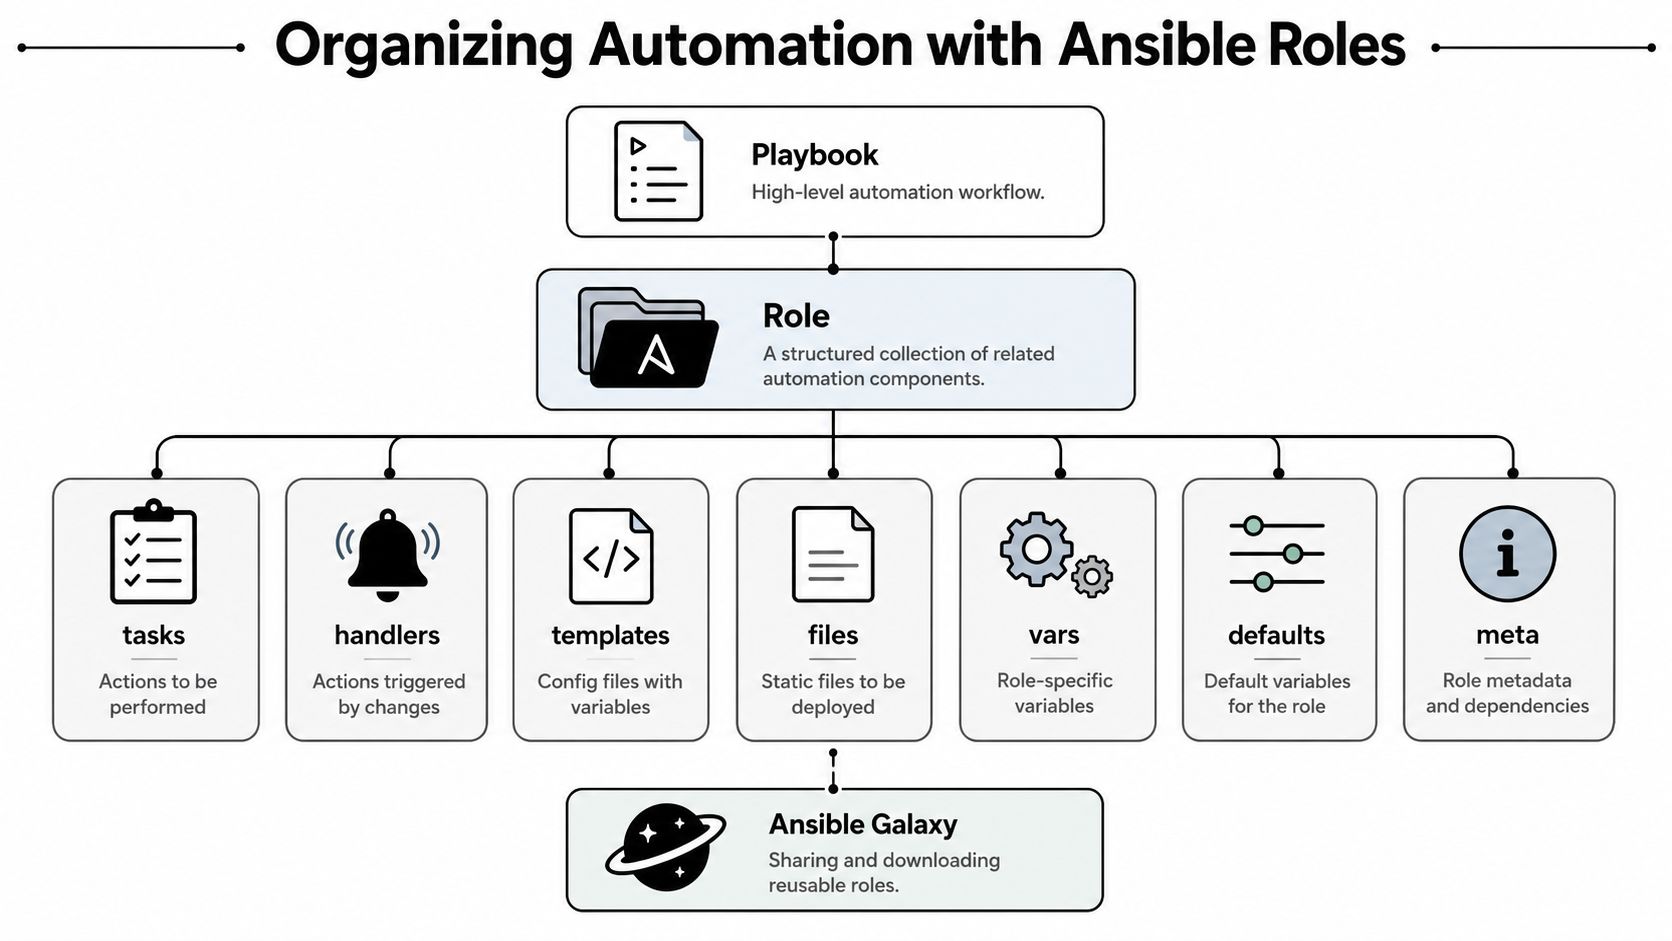
Roles solve that by giving automation a standard structure. Instead of one oversized playbook, you create reusable units for things like nginx, app, postgres, or common-hardening.
This matters even in small environments because structure is what lets you:
- Reuse logic across projects
- Review changes without reading unrelated tasks
- Test components in isolation
- Hand work off to another engineer without a long explanation
If you care about versioned, reviewable operations, this role-based layout also fits naturally with Git-centric workflows. If you want a broader operational model for that style, Fivenines' GitOps guide is a useful reference for understanding how declarative infrastructure and Git reviews fit together.
A role structure that stays maintainable
A standard role looks roughly like this:
| Directory | Purpose |
|---|---|
tasks/ |
Main actions |
handlers/ |
Triggered actions such as service restarts |
templates/ |
Jinja2 templates for configs |
files/ |
Static files to copy |
vars/ |
Higher-precedence role variables |
defaults/ |
Safe default values |
meta/ |
Metadata and dependencies |
A clean project often ends up looking like this:
site.yml
roles/
  nginx/
    tasks/
    handlers/
    templates/
    defaults/
A role is easier to reason about because each file has one job.
Use Galaxy carefully
Ansible Galaxy can save time, but don't confuse “available” with “production ready.” Community roles vary a lot in quality, assumptions, and maintenance style.
Use Galaxy roles when they give you a solid base, then inspect them like any other dependency. Read the defaults, review the tasks, and look for heavy shell usage or surprising side effects.
Good candidates for reuse tend to have:
- Clear variable names
- Predictable task ordering
- Sensible defaults
- Straightforward handlers
Poor candidates hide too much magic. If a role makes it hard to tell what happens on your hosts, it isn't saving time. It's moving the confusion somewhere else.
Securing Your Automation with Ansible Vault and Best Practices
The fastest way to sabotage an automation project is to store secrets in plain YAML and promise you'll “clean it up later.” Later usually never comes.
Vault first not later
For production use, Ansible Vault is mandatory. A best-practices summary from Spacelift states that storing credentials in plain text YAML is the root cause of 60% of security breaches in new automation projects, and the same source notes that 32% of users skip --check, which leads to configuration drift and costly recovery work.
That's enough reason to treat secret handling as a day-one concern.
Typical candidates for Vault include:
- API tokens
- Database passwords
- Cloud credentials
- TLS private material
- Per-environment secret variables
The workflow is simple. Create an encrypted vars file, edit it with ansible-vault edit, and reference those variables from your playbooks. At runtime, supply the vault password or a configured password file in a secure way that matches your environment.
Don't encrypt everything. Encrypt sensitive values. Keep normal configuration readable so code review stays useful.
Execution habits that prevent bad surprises
Secure playbooks aren't just about secrets. They're also about how you run them.
A short production checklist:
- Use
--checkbefore risky runs. Dry-run mode catches bad assumptions before they touch hosts. - Add
--difffor config changes. Seeing the exact file delta makes reviews and debugging much easier. - Prefer purpose-built modules.
package,service,copy, andtemplateare easier to reason about than raw shell. - Justify
shellandcommandusage. If you must use them, leave a comment explaining why there isn't a better module. - Be explicit in conditionals. Type handling can get messy, so write conditions clearly.
Here's the opinionated version. If a playbook touches production and you didn't run --check, you accepted unnecessary risk. If it contains plaintext credentials, it shouldn't be merged. If it leans on shell for ordinary tasks, it probably needs a rewrite.
Operational advice: The safest automation is the kind another engineer can audit in five minutes.
Common Troubleshooting and Your Path to Advanced Automation
Even well-written playbooks fail. The difference between a beginner and a reliable operator is usually how they debug.
How to debug without guessing
Most Ansible errors fall into a few buckets:
- YAML formatting mistakes such as bad indentation or invalid list structure
- Connection problems tied to SSH users, keys, or privilege escalation
- Module failures caused by missing packages, unsupported states, or bad assumptions
- Variable issues where a value is undefined or shaped differently than expected
When something breaks, increase verbosity and read from the first real failure, not the last line of output. The last line often tells you only that the run stopped. The useful part is usually the task context, module arguments, and returned error a few lines earlier.
A good debugging rhythm is simple. Reproduce on one host. Minimize the play. Remove unrelated tasks. Confirm the module does what you think it does. Then scale back out.
Using AI without trusting it blindly
AI tools are now part of many Ansible workflows. According to a Reddit discussion cited in your verified data, 78% of professional Ansible users use AI tools to generate or debug playbooks, while fewer than 15% of beginner tutorials explain how to safely review that output, as noted in this Reddit thread.
That matches what many teams are experiencing. AI can draft tasks quickly, but it also produces brittle patterns, unnecessary shell commands, and insecure secret handling if you accept output without review.
Use AI like this:
- Ask it for a first draft, not a final answer.
- Replace generic modules with specific ones where possible.
- Check idempotency.
- Review privilege escalation and secret handling.
- Run
--checkand inspect the diff before trusting it.
That approach will take you much farther than memorizing syntax. Once you can model systems as inventory, playbooks, and roles, you're ready for dynamic inventory, CI/CD integration, and larger orchestration patterns.
If you're using Ansible to standardize infrastructure because your team is preparing to run more automated workflows, Donely is worth a look. It gives teams a unified way to host, deploy, and manage AI employees across isolated instances with centralized monitoring, RBAC, audit logs, and built-in integrations, without adding more DevOps overhead to an already busy stack.